
IT environments are a dynamic situation with changing problematics, requirements and needs of users. System administrators have to face these dynamics while maintaining IT operations. Therefore, they have to regularly deal with new software solutions and check whether they fit the requirements, needs and circumstances of their own IT environment. In this article, we want to show how Univention App Appliances can help with this. As pre-configured virtual images ready for immediate use with an integrated operating system, they can be used to quickly try out new software, switch it off if it fails to deliver the desired results, or, if the evaluation is successful, transfer the test solution to live operation.
Evaluation in manual steps
Let’s say you want to get to know and test the solutions OpenProject and Rocket.Chat. Both are web-based solutions where the software must be installed on a Linux system, such as Debian GNU/Linux, in order to be delivered to the user’s browser via a web server. To do this, you would normally need to perform the following steps:
1. Set up a Debian environment in a suitably dimensioned virtual machine.
2. Download package dependencies for the software.
3. Download and install software.
4. Configure web servers and other services involved.
5. Configure software to suit your needs.
This approach requires a certain amount of experience with Linux and, while providing a lot of control throughout the process, also opens up space for errors. And, provided everything goes well, the estimated time to get everything up and running is roughly at least two hours.
Since in many IT environments the administration of users is carried out via a central directory service, the connection to this service should also be checked – for a test of a new software solution to be realistic. Thus, when configuring the respective solutions for the evaluation, the individual steps for connecting also have to be performed.
If you want to transfer the software solution to continuous operation after successful evaluation, recurring manual steps are required with each update to keep the system up-to-date and on the necessary level of knowledge.
Altogether this procedure requires a significant amount of time, for updates even repeatedly, to maintain the software. It increases costs and the potential space for errors.
Saving Time with Univention App Appliances
As an alternative, the Univention App Appliances are available, which relieve you of manual installation and connection of the directory service and enable you to concentrate on testing the solutions.
An App Appliance is a pre-configured virtual machine where Univention Corporate Server (UCS), based on Debian GNU/Linux, is installed as operating system and a software solution like the above mentioned solutions Rocket.Chat or OpenProject are already installed and integrated into the identity management of UCS. These UCS App Appliances are available for the virtualization solutions VMware, VMware ESXi, VirtualBox and KVM.
Let us now walk together through the individual steps of setting up an appliance with VirtualBox. You can apply the same procedure to any Univention App Appliance.
Download App Appliance and import it into virtualization solution:
Use the Appliance Available filter to get an overview of the solutions for which App Appliances are available in the App catalog and download the corresponding image for your virtualization solution. VMware and VirtualBox are suitable for operation on a notebook. Describing the detailed installation of the virtualization solution for your operating platform, however, is beyond the scope of this article. After downloading the app appliance, it must be imported into VirtualBox and then needs to be started.
1. Go through the System Setup Wizard:
 When the appliance starts, the UCS System Setup Wizard will appear and guide you step-by-step through the basic configuration to set the time zone, language, keyboard layout, network configuration, domain setting, administrator password, and machine name.
If you want to run the appliance on its own, select the first item under Domain setup.
If you want the appliance to be part of an existing UCS or AD environment, select the appropriate option here.
The configuration is complete as soon as you see the three-step path (see screenshot) for accessing the appliance.
Open your web browser and enter the address shown in the address bar. You can define an exception for the UCS SSL certificate for Chrome/Chromium and Firefox.
2. Activating the App Appliance:
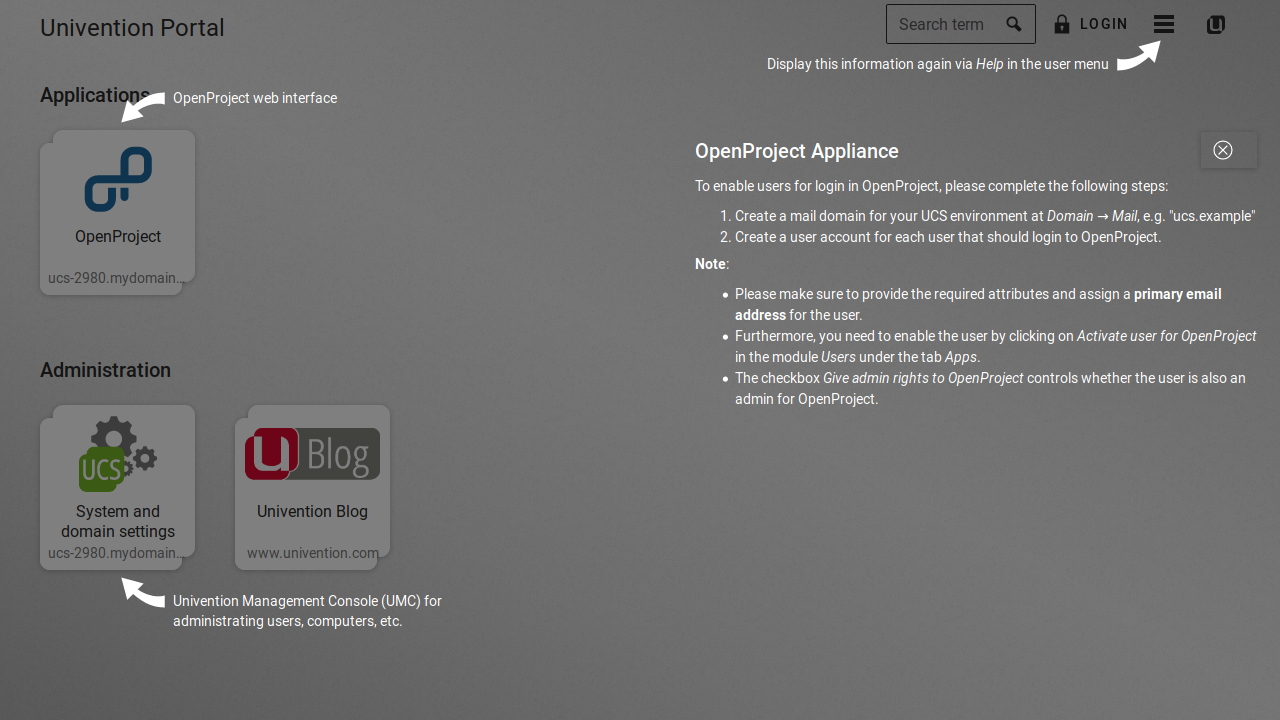
When the appliance is first accessed via the browser, you are prompted to activate the appliance. Please follow the instructions in the browser. After importing the activation file, you will see the portal page of the appliance and instructions on how to proceed with the respective app.
3. Creating users and activating them for the app:
In order for users to be able to log on to OpenProject, for example, they must first be created in the UCS management system. Important are a user name, a primary e-mail address and the activation for the app under the “Apps” tab.
4. Registration and Start
The user can then log on to the app with their credentials and test the software solution.
Depending on hardware resources and app appliance, the setup takes between 10 and 20 minutes to complete. With the subsequent activation and creation of a first user, a system administrator has a running system that is fully integrated with the identity management in just 30 minutes with the app appliance. Compared to the manual procedure, this is a considerable amount of time saved.
If multiple apps are to be evaluated, they can even be combined into one UCS domain by selecting the option to join an existing UCS domain in the System Setup Wizard under Domain Settings for the next appliance.

Wekan: The Open Source Kanban Board as Alternative to Trello
Whether you’re maintaining a personal TODO list, planning your holidays with family or friends, or working in a team on your next revolutionary idea – Kanban boards are a great way to organize tasks, visualize a project’s current state, and become more efficient. There are plenty of Kanban solutions out there, but if you’re looking for an Open Source alternative to Trello, then check out Wekan.
Continuous Operation
If the solution convinces you and the evaluation shows that it meets the requirements and needs of the end-user and is suitable for the conditions of your own IT environment, the question of long-term operation arises.
Univention App Appliances are a complete UCS system that is regularly updated. The app appliance you install also receives all updates that are provided by the app provider via the App Center.
For continuous operation, however, there arise a few questions that I would like to answer briefly in the following.
How many users will work with the solution and how high will the expected volume of data be?
The appliances are pre-configured with a 50 GB virtual hard drive and offer only limited storage space. This storage can be extended for the virtual machine, as is exemplary described for Nextcloud and ownCloud, and the same steps can be applied onto other appliances.
Should the solution be operated as a stand-alone solution or be connected to an existing environment?
A stand-alone system is ideal for an evaluation that is separate from the production environment and contains random test data. Perhaps you already have a test environment for evaluations that can be used for this purpose.
For production use, however, integration into the existing environment is often desirable, preferably with a connection to the directory service or the mail server. For this purpose it is recommended to set up the app appliance anew and to connect it to the existing environment for identity management via the System Setup Wizard, because the time required is minimal and manageable. This allows existing user accounts to be activated for the software solution more quickly and easily. This also has the advantage that “data and configuration legacy loads” from the evaluation have no direct influence on the productive operation.
Where can I purchase subscriptions and support?
The question of technical support and software maintenance often arises for productive operation. In a UCS App Appliance, there are usually two software solutions from different manufacturers involved – with UCS as the operating platform and the app.
For UCS there are enterprise subscriptions that include support. For most apps there are also corresponding offers from the providers. Further information can be found on the websites of the app providers, which can be reached directly on the respective app’s detail page via the link “Support Options” of the respective app. For some apps such as Nextcloud, OpenProject or ownCloud there are suitable offers in our App Center Shop, where you can directly purchase the license for the respective app without having to contact the provider. The apps that can be purchased are also linked from the App Center catalog detail pages.
Most apps in the Univention App catalog allow for a free evaluation, i. e. unlimited or limited to 30 days or to a certain number of users. Each app provider has its own individual policy and the information can usually be found in the app description. Many apps require a contract for productive operation, which may include a maintenance contract or support, or both, depending on the model.
To Conclude
Univention’s App Appliances are ideal for quickly implementing software solutions with minimal time spent to compare the requirements and conditions of one’s own IT environments. They can be easily updated and the involved vendors offer appropriate support for their solutions.
Take a look at the App Appliances we offer and convince yourself by evaluating the corresponding solutions.

