Since the beginning of spring, school authorities and other educational institutions have been faced with the challenge of continuing their teaching with no or only limited face-to-face interaction. This article introduces the web conferencing system BigBlueButton, which may be a possible solution to this problem. In the first part of the article I would like to give you an overview of the most important functions of BigBlueButton and briefly discuss what you need to pay attention to the sizing of the servers and how to deal with problems caused by NAT and firewalls of the users. In the second part, I will explain how to integrate BigBlueButton into your UCS environment step by step so that users can use it with their usual credentials.
What is BigBlueButton?
BigBlueButton is an open source project that focuses specifically on the needs of online teaching. The project aims to make participation in video conferences easily accessible. All that is usually required on the participant side is an end device with an up-to-date browser.
The project was founded in 2007 at Carleton University. Since then, it has been continuously developed. During the development, the stability of the software was a priority.
The last major release was in March 2020, when the client-side part of the application was completely renewed, so that now, thanks to HTML5, only end devices with an up-to-date browser are required to participate in conferences. In times of corona, the demand for BigBlueButton has been growing rapidly and so every few days smaller updates were released for BigBlueButton , which improve and extend BigBlueButton.
It’s easy – Organize a video conference with BigBlueButton
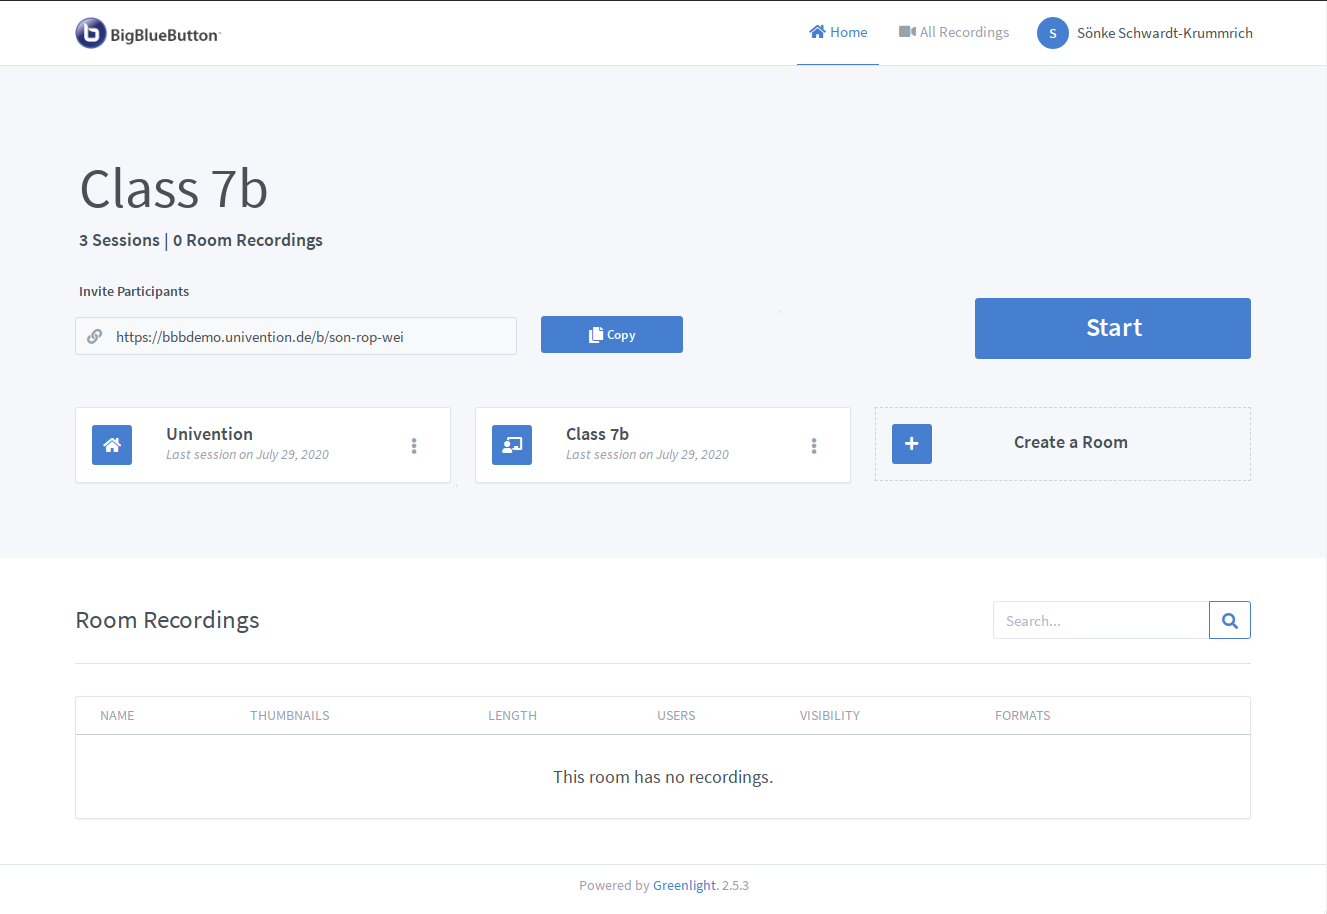
After creating a conference room in BigBlueButton, the moderator of the conference must make the URL of this conference room known to all participants, e.g. by mail, so that they can join the room through their browser. If desired, access to the conference room can also be protected from unwanted participants with a PIN.
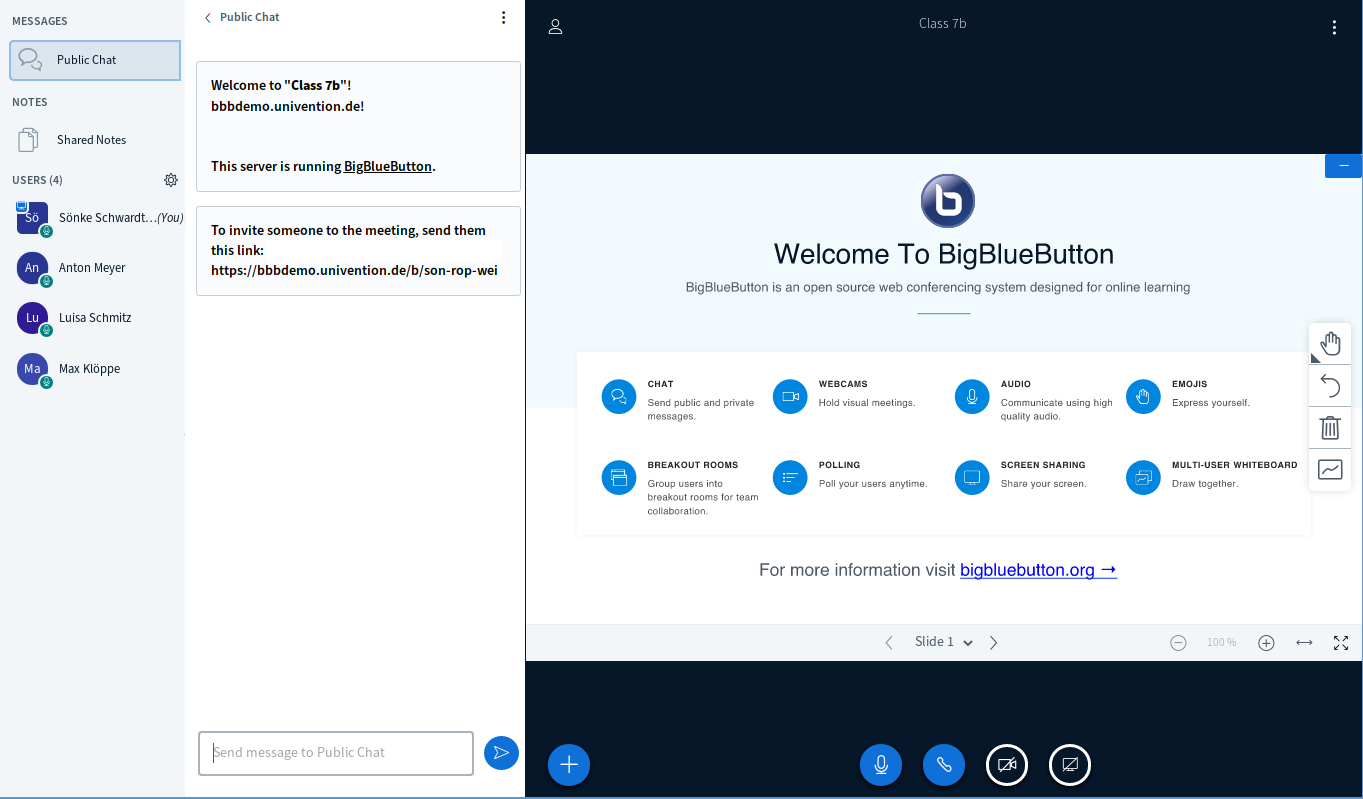
When joining a conference, BigBlueButton automatically performs an echo test, which allows you to test your own audio setup before you actually join. Those who frequently participate in video conferences will appreciate this feature, as it avoids waiting until every participant has activated his or her microphone successfully. In addition to the audio transmission, the video transmission of a webcam connected to the computer can of course also be activated, so that all participants can see each other.
But BigBlueButton also offers the possibility for participants without audio/video hardware to join the conference using their normal telephone. Participants can follow the visual content through their browser so that a lack of audio equipment does not become an obstacle. The prerequisite for this is the configuration of a VoIP provider that automatically forwards incoming calls to the BigBlueButton server.
Further features: presentations, whiteboards, recording, chat…
In addition to these features known from video conferencing systems, there are others that are especially useful for educational purposes:
- The presentation of slides (PDF, Open Office documents, PNG, …)
- A whiteboard, which can be shared with all participants in writing if required
- Screen sharing for sharing a selected application or the entire desktop with the other participants
- Breakout rooms, which can be used to start sub-conferences for subgroups for a limited period
- Synchronized video players – for watching e.g. YouTube videos together (the moderator’s video player also controls the video players of the participants)
- Conducting surveys among the participants
- Shared notes via an integrated etherpad
- Common chat room for all participants and private chat rooms for each participant pair
- Recording of conferences including slides, whiteboard and mouse movements
If necessary, almost all of the features mentioned and many more can be configured more precisely by the administrator of the BigBlueButton system.
If you would like to test BigBlueButton , you can conduct your own demo conference. The duration of these conferences is currently limited to 60 minutes due to corona.
Required resources for up to 100 participants
Depending on the hardware configuration, a single BigBlueButton system can serve up to 100 participants, which can be distributed over a single or multiple conferences. The maximum size of a single conference depends on many factors, such as number of participants, number of active webcams, quality of the video streams, hardware equipment of server and participants or even the network connection of the server, so that no general statements can be made here. The project has compiled some key points:
- Minimum server requirements
- Bandwidth Requirements
I therefore recommend setting up a test environment for a practice-oriented test.
If it should become bigger – The BigBlueButton cluster
For larger environments, such as universities or school boards, a single BigBlueButton system is not sufficient. With the help of the open source load balancer Scalelite, which was developed especially for BigBlueButton , several BigBlueButton systems can be combined into a cluster on which the individual conferences are distributed.
For the automated rollout of such large environments, there are ready-to-use Ansible Playbooks available both at the project and on other websites, which do the work of installing the cluster for you.

Jitsi Meet and the UCS Identity Management
In recent weeks, the increased demand for video conferencing solutions has kept us in the App Center team busy. we have intensively studied various open source solutions for video conferencing and published quickly Jitsi Meet as an app in the App Center …. read more
Installation of BigBlueButton and provisioning with UCS users
In the following, I would like to describe a very simple and generic way to install your first own BigBlueButton server with public IP address and Let’s-Encrypt certificate. This server will then be connected to the identity management of a UCS domain.
Up to now, the BigBlueButton server has been mentioned several times, but we need to specify it a bit more precisely. The video conference system presented here consists of two parts:
On the one hand “BigBlueButton”, which provides the actual video conference server (including audio bridge and video SFU), and on the other hand “Greenlight”, a frontend for the administration of conferences and users.
BigBlueButton is externally controlled by a simple and effective HTTP-API (Application Programming Interface). The frontend Greenlight, which is used in our setup, also uses this API, e.g. to create new conferences or to add new participants to a running conference. In addition to Greenlight, many other applications such as Moodle, Joomla or Drupal also use the API, which have integrated BigBlueButton into their application.
After installing the conference server, we will configure Greenlight so that it uses the corresponding objects of the UCS domain for provisioning users. A manual maintenance of users in Greenlight will not be necessary.
Video-conferencing despite symmetric NAT: Installation of a TURN server
Before we start with the installation, we need to take a look at one more component, because even with a conference server that has a public IP address, users may experience connection problems with the BigBlueButton server.
This is because the Internet provider or the user’s router often uses a firewall or different types of NAT. These mechanisms can interfere with the audio and video streams of conference systems like BigBlueButton. To enable these users to participate in BigBlueButton conferences, a so-called TURN server can be set up (TURN stands for “Traversal Using Relays around NAT”). The TURN server acts as a relay and receives the data streams for audio and video from the BigBlueButton server and forwards them to the participant (and vice versa). The TURN server uses various tricks to pass NAT and firewall.
For the BigBlueButton installation path we have chosen here, the TURN server must be installed on an independent system or virtual machine with its own public IP address and public DNS entry. However, there are no special demands on CPU or memory resources for the operation of the TURN server. In many cases a 1-core system with 2GB RAM is sufficient. Nevertheless, the network connection of the TURN server should correspond to that of the BigBlueButton system, because in extreme cases the entire data traffic between the BigBlueButton system and the conference participant systems is routed through the TURN server.
The BigBlueButton project has already described in detail how to set up its own TURN server in its documentation.
If a TURN server is already available, it can of course be used. Later, when installing BigBlueButton, the FQDN of the TURN server (here in our example turndemo.univention.de) and the password for accessing the TURN server will be required.
Requirements for the installation
As already mentioned, the number of possible participants is strongly dependent on the resources of the system. Therefore, the BigBlueButton project recommends the following minimum requirements for setting up your own server:
- 8 GB RAM
- 4 CPU cores
- 500GB free space in file system for conference recordings
- Network connection with 250 MBit/s bandwidth (symmetrical)
If the system is protected by a firewall, the following ports of the BigBlueButton system must be accessible from outside:
- TCP ports 22, 80 and 443
- UDP ports 16384 to 32768
Furthermore, the BigBlueButton system must be able to access port 7636 of the UCS LDAP server to be used later.
In order to make the BigBlueButton system easily accessible for all participants and to obtain a Let’s-Encrypt certificate for the system automatically during this sample installation, a DNS-A record for the public IP address of the server system must be set up before installation. In these installation instructions, the FQDN bbbdemo.univention.de is used as an example.
As operating system BigBlueButton version 2.2 requires Ubuntu 16.04.
Automatic installation of BigBlueButton
For a quick basic installation of BigBlueButton the project offers an installation script, which installs and configures all necessary components on a clean Ubuntu 16.04 system (64bit). It is recommended to choose a Ubuntu minimal installation, because the system should not have any applications like apache, plesk, etc. installed.
Again, the project has created a very detailed installation guide which is maintained together with the installation script on Github.
The script allows the installation of BigBlueButton on the Ubuntu system with a single command. Before doing so, you have to log in as user root on the system or become user root via the command sudo su -.
Before the actual installation, you should carry out some checks on the system, which are described in the section „Pre-installation checks“.
If the check was successful, the installation can be started with the following command:
root@bbbdemo:~# wget -qO- https://ubuntu.bigbluebutton.org/bbb-install.sh | \
bash -s -- -w -g \
-v xenial-22 \
-s bbbdemo.univention.de \
-e bbbadmin@example.com \
-c turndemo.univention.de:MYTURNSECRET
The command downloads the installation script directly from the project’s server and starts it immediately with all necessary parameters. Among them is
-v xenial-22: the BigBlueButton version to be installed-s bbbdemo.univention.de: the public FQDN of the system for which a Let’s-Encrypt certificate is obtained-e bbbadmin@example.com: the contact e-mail address needed to request a Let’s-Encrypt certificate-c turndemo.univention.de:MYTURNSECRET: the FQDN of the TURN server as well as the necessary password
After the installation is completed via the script, which takes about 15 minutes, the BigBlueButton server can theoretically be used immediately. The frontend Greenlight, which is included in the standard installation, is ready for use and can be reached at https://bbbdemo.univention.de/ in the above example. If the configuration has not yet been adjusted, any user can currently register with the instance, log in and set up their own conference rooms.
Greenlight: Configuration of the LDAP-Authentication against UCS
In order to limit the logon possibilities to the BigBlueButton system, the installed greenlight is connected to an existing UCS domain. For this purpose the registration for the local user database of Greenlight is deactivated and instead the LDAP account provider is configured and activated. Greenlight accesses the LDAP port 7636 of a UCS domain controller for this purpose. If a firewall is active, it must be adjusted to allow access.
To access the UCS LDAP servers, Greenlight first requires a simple authentication account in the UCS domain. This can be done on the UCS domain controller master with 3 command line commands.
First the LDAP base is read out via the „ucr“ command. In addition, we use the pwgen command to create a long, random password. The third command finally creates the authentication account. Thereby the LDAP base and password must be adjusted.
root@master:~# ucr get ldap/base
dc=bbb,dc=univention,dc=de
root@master:~# pwgen 32 1
aeg4eeveigh1EShoh2Taedau8uDoocei
root@master:~# udm users/ldap create \
--position “cn=users,dc=bbb,dc=univention,dc=de“ \
--set username=“bbbauth“ \
--set password=“aeg4eeveigh1EShoh2Taedau8uDoocei“
root@master:~#
If the simple authentication account was created, the LDAP account provider can now be activated on the BigBlueButton system. For this you have to be logged in again as user root on the BigBlueButton system. Then the file /root/greenlight/.env has to be adapted.
In the configuration file, the options for authentication using LDAP are not yet set in the standard configuration. The following values must be entered for them, although some values must also be adjusted here:
LDAP_SERVER=master.bbb.univention.de
LDAP_PORT=7636
LDAP_METHOD=ssl
LDAP_UID=uid
LDAP_BASE=dc=bbb,dc=univention,dc=de
LDAP_BIND_DN=uid=bbbauth,cn=users,dc=bbb,dc=univention,dc=de
LDAP_AUTH=simple
LDAP_PASSWORD=aeg4eeveigh1EShoh2Taedau8uDoocei
LDAP_ROLE_FIELD=
LDAP_FILTER=(univentionObjectType=users/user)
LDAP_ATTRIBUTE_MAPPING=uid=uid;name=displayName;email=mailPrimaryAddress;nickname=uid
Please note that the FQDN entered in LDAP_SERVER must match the FQDN stored in the SSL certificate of the LDAP server. Otherwise the LDAP connection is rejected by Greenlight with an error 500.
If the LDAP authentication works, Greenlight’s own accounts can be disabled. For this purpose the following option must be set:
ALLOW_GREENLIGHT_ACCOUNTS=false
To activate the changes, they must be transferred to the docker container in which Greenlight is running. This is achieved using the following commands:
root@bbbdemo:~# docker-compose -f /root/greenlight/docker-compose.yml down
root@bbbdemo:~# docker-compose -f /root/greenlight/docker-compose.yml up -d
After executing the two commands, Greenlight needs a few seconds to start up completely (usually 15-20 seconds).
This completes installation and customization.
In this example you can now log on to BigBlueButton resp. Greenlight with user names and corresponding passwords from the UCS domain. The LDAP_FILTER option can be used later to further restrict the group of allowed users. There are also many more options in the very detailed documentation of the project to further customize or extend the BigBlueButton instance to your own needs.

