More about Identity and Service Providers, SAML, OpenID Connect and other technical Requirements for User Authentication
Single sign-on (SSO) is an authentication process which allows users to log in to many different applications with only one set of credentials. They enter their username and password once and are automatically granted access to all programs and services which have been made available to them. After they have authenticated successfully for the first time, the SSO mechanism takes over and handles the authentication to all the other services.
In this article, I’m going to explain the technical background first. After that I’ll go into more detail concerning the two authentication standards OpenID Connect and SAML (Security Assertion Markup Language) – both methods are available for Univention Corporate Server (UCS). I’m also going to show the SSO authentication process for both standards, followed by some troubleshooting tips. For some of the technical terms I use in this article I’ve added an explanation in the small SSO glossary.
Table of Contents
Small SSO Glossary
- Identity Provider: The service which authenticates users (for example username and password verification) to confirm that a person is who they say they are.
- Service Provider/Relying Party: Remote service, i.e. the party which relies on the fact that someone has been successfully authenticated.
- Entities: Uniquely identifiable objects or services interacting in the authentication process.
- Web Endpoints: HTTP/HTTPS URLs for communication and message exchange between the web services.
- Issuer: The issuing entity, i.e. the entity that wrote, signed and authenticated a message.
What is Single-Sign-on?
Every time a user logs in with a username and the associated password, he proves to the underlying system that he really is who he claims to be. Sometimes a second factor is involved, such as a YubiKey or an text message – this is called two-factor authentication (2FA). Regardless of how the login process actually happens, after the authentication was successful, the user has access to the service to which he or she has just logged in. The service opens its own session for this purpose, and further communication takes place via this session.
So how does this process work if the Identity Provider and the Service Provider are running on different systems, especially if the Service Provider should never receive the user’s password? For SSO to work, there has to be trust between the services and the single point of authentication. This means that during the login process some kind of proof of successful login must be passed to the external service. For example, if a user logs in to a service like the UCS portal, the portal has to communicate with the connected external services. This requires a framework or a protocol which has to be configured accordingly to exchange messages securely.
There are various SSO mechanisms and protocols. In this article, I’m focusing on web single sign-on: users log in to the web-based UCS portal once and have access to apps and services of the domain afterwards.
Let’s first take a look at how single sign-on with OpenID Connect and SAML works.
Single Sign-on with OpenID Connect
Before users log in for the first time, admins have to establish trust between the Identity Provider (here: UCS) and the other services. OpenID Connect uses a shared secret for this: a very long password. Administrators must therefore store the same shared secret in UCS and in the external service’s configuration. OpenID Connect uses several URLs as endpoints for exchanging messages and for the different actions. For example, those URLs are used for logging in, retrieving information about the user, and logging out.
When using OIDC, admins should take into account that all servers offering services to users via SSO should have a direct HTTPS connection to the Identity Provider, in our case UCS. It therefore makes sense to plan the firewall rules and the forwarding accordingly.
In the following example, the UCS IdP has the hostname ucs-sso.mydomain.intranet. Please adjust this to your own domain if necessary. The URL https://ucs-sso.mydomain.intranet/.well-known/openid-configuration offers all metadata needed for configuration and for connecting to other services. First, the issuer is defined, i.e. the issuing entity (here: the UCS SSO OpenID Connect provider). Next, you can see various endpoints for exchanging messages. The first one is authorization_endpoint, this is where the actual authentication is expected. The userinfo_endpoint is where the user data can be accessed.
Single Sign-on with SAML
In SAML, trust between Identity Providers and services is ensured by exchanging certificates. Like with web servers, there are two certificates (public and private). Administrators have to save the UCS IdP’s public certificate when setting up the service so that the service users log in to can verify the authentication of the UCS IdP.
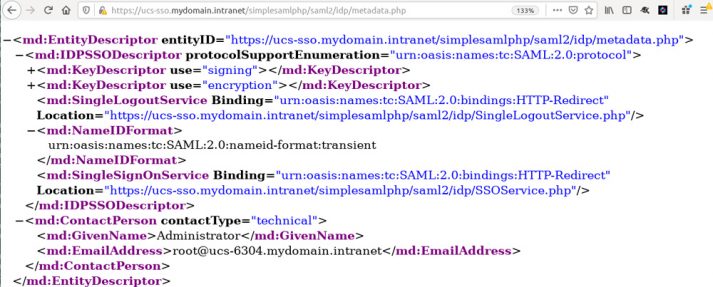
Let’s take a look at the SAML endpoints. Just like in OpenID Connect, this works via HTTPS URLs where the messages are sent to. However, there is one important difference: SAML doesn’t require a direct connection between the Service Provider and the Identity Provider. Only the user’s web browser must be able to reach both sites.
The SAML endpoints and metadata can also be accessed by a URL (https://ucs-sso.mydomain.intranet/simplesamlphp/saml2/idp/metadaten.php). At the top you’ll see the entityID – this is like the issuer in OpenID Connect: it identifies the SAML IdP for the respective services. At the end of the rather complex XML file you can see the endpoints for the exchange of messages.
How does SSO work with OpenID Connect and with SAML?
So, how exactly does the login to a service work? Let’s look at both methods, OpenID Connect and SAML. It’s vital to understand all the single steps, especially if things don’t work as expected and you need to identify problems and do some debugging.
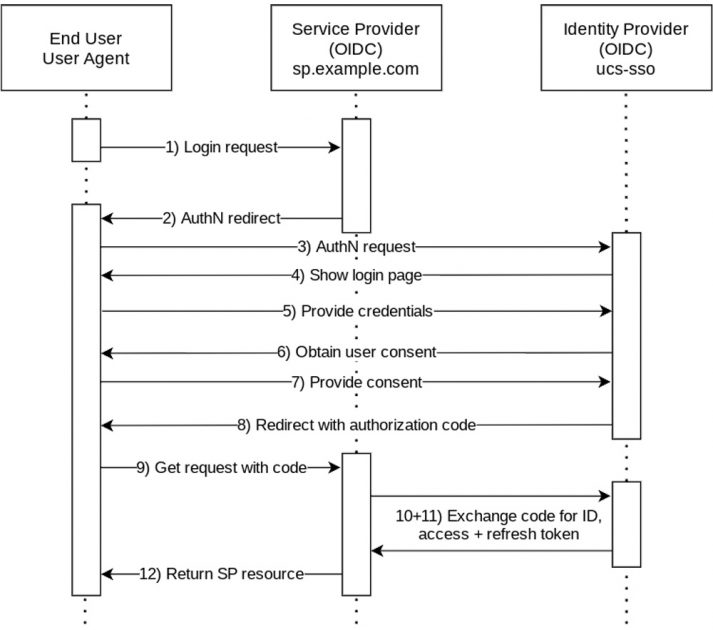
Let’s start with OpenID Connect: On the left side you can see the end user or user agent, i.e. the web browser. The middle column shows the service to which the user logs in, for example Kopano Meet. The right side in the diagram shows the Identity Provider, i.e. UCS.
1. A user opens a website in his or her browser. After a click on the login button various redirections take place.
2. The first redirection goes back to the browser.
3. Next, a request gets redirected to the UCS IdP. Among other things, it transmits the name of the service to which the user wants to log in, so that the user can be redirected to the correct place after logging in.
4. The IdP sends a login page to the user, who is unknown so far, i.e. has no session yet.
5. The user enters his or her credentials, for example username and password.
6. The Identity Provider asks the user again: Service XYZ has requested data from you (e.g. email address, phone number, etc.), and the user can agree to that. In UCS we usually skip this step, because the administrator has already agreed that the data should be transferred just by setting up the service for the users.
7. The user confirms the request.
8. After successfully logging in, the web browser receives an authorization code, a so-called token.
9. This is redirected via HTTP request back to the service the user wants to log in to.
10. Now comes a special feature of OpenID Connect: The service contacts UCS again: “A user has just sent a code, please provide further information.” This can be the email address, a group membership, phone number, or something else.
11. The Identity Provider submits the requested information.
12. Only when this has been successful, the service opens a session, the user can log in and use the service.
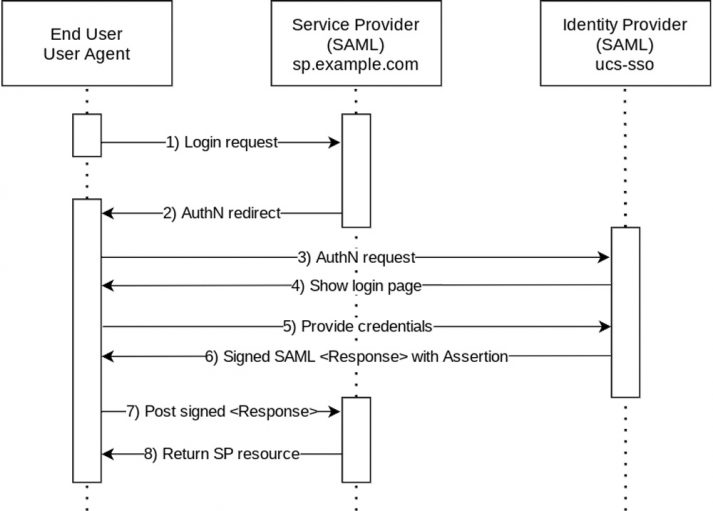
Let’s take a look at the SAML work flow:
1. The start looks similar: The web browser opens the login page of the service or of the UCS portal, and the user clicks the login button.
2. The browser receives an authentication redirection request.
3. Everything gets transferred to the UCS single sign-on site.
4. The user gets asked to enter his or her credentials.
5. The user logs in, for example with username and password.
6. Next, you’ll see a special feature in SAML: To verify the login, the user receives a SAML assertion, an XML file which has been signed with the IdP’s certificate.
7. The user or rather the web browser sends this to the service.
8. The service finally decides whether the login is valid or not. Only if the message is signed with the correct private key of the UCS certificate, the service authenticates the login and grants access to the user.
Please keep in mind that the configuration of the services can differ. Some services make it pretty easy to enter the meta data, others have a more complex configuration. Therefore, it’s good to understand the general procedure and the respective work flows.
How to debug Single Sign-on with SAML
Both methods have one thing in common: a lot of messages are exchanged. As UCS admin you can look at those messages for debugging purposes. If something is working, you have several options to track down a problem. In case of SAML, I recommend the Firefox add-on SAML-tracer. It shows the messages messages sent through the browser during the one-time login and one-time logout. Debugging of OIDC is a bit more complex because of the encrypted communication between service and IdP, so let’s skip this for now.
Please make sure to open a private window in Firefox or an incognito window in Chrome when debugging. It has happened to me in the past that I adjusted the configuration, but couldn’t see any changes – a session in my browser cache simply messed up my current test.
As always, I recommend looking at the log files, both the UCS logs (Identity Provider) and the Service Provider’s logs. Especially for external services this can be important. We’ve sent a valid message (in our opinion) to the service, but receive a not very meaningful error message, and users can’t log in. If the admin doesn’t have access to the logs, it can be helpful to ask the support team of the external service if they see any helpful information in the log files.
UCS as Identify Provider uses Syslog, so every login should appear in the file /var/log/syslog. If the information is not meaningful enough, it helps to increase the debug level. To achieve that, admins can set the UCR variable saml/idp/log/debug/enabled to TRUE and saml/idp/log/level to DEBUG.
SAML Debugging with the Firefox Add-on SAML-tracer
Finally, I would like to show how administrators can use the Firefox extension SAML-tracer to view and analyze the SAML messages. In my example, I’ve clicked the LOGIN button in the UCS portal to open the dialog for entering my username and password. At the same time, the Firefox add-on is running in the background and keeping track of the events:
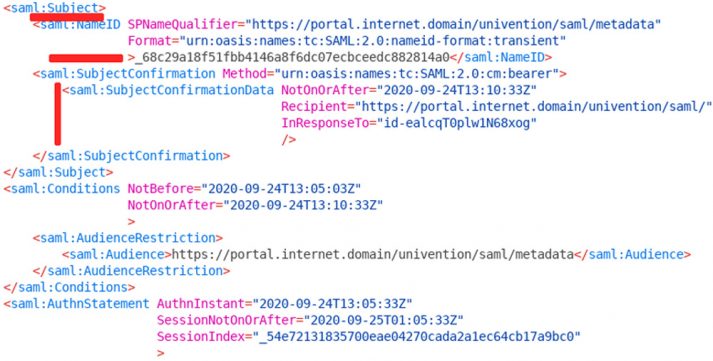
The tab SAML shows detailed messages. In the screenshot you can see that the browser has sent the authentication request (AuthnRequest) to UCS. The log shows the AssertionConsumerServiceURL, i.e. the requesting URL. As a result, the UCS server now knows that the request comes from portal.internet.domain. The destination is also revealed – UCS can now make sure that it is really meant. In addition, an identifier (ID) is sent along; this will also appear in the response after the user has successfully logged in. A timestamp shows when this all happened. The issuer transmitted in our example is the portal.
Important information regarding the timestamps: Whether you’re using OpenID Connect or SAML – it’s imperative that all clocks go correctly! All messages exchanged are only valid for a limited time to prevent potential attackers from recording the network traffic, decrypting the packet (with a lot of computing time) and trying to log in themselves.
Back to our example: the user has logged in with username and password and the browser has been redirected to the portal. What exactly happened in the background to identify the user? First of all, a SAML response has been transmitted; it includes the timestamp as well as the portal as Destination. The identifier is included in the InResponseTo attribute which picks up the session we just started in the portal. The answer also contains the issuing side (Issuer), in this case the UCS Identity Provider. This helps the portal or the external service with the assignment based on the certificates which the administrator has previously stored.

You’ll notice that the log shows more than one Issuer entry. This is due to the fact that the rather complex message is divided into different sections which can also be interpreted by the different services. The section beginning with Subject shows more information about the user who has logged in. Our example shows a long string in the 4th line: the username isn’t sent as Subject, instead it follows later as an attribute. The configuration varies, depending on the SAML service.
The SubjectConfirmationData again shows the portal as the recipient of this message. Also, the session ID is transferred for a correct assignment. At the end of the message (not visible in this screenshot), various attributes are listed, including the user name. The portal needs this information so that the internal assignment is successful.
Any further Questions?
This whole topic is quite complex, admittedly. If you want to adjust the configuration at a later point, please make sure that all other servers in the domain are set up accordingly. It’s also important to take into account systems that may be added later. You can set up a UCR policy, as described in this separate article in our Knowledge Base.
I hope this article was helpful and explained the SSO basics as well as OpenID Connect and SAML. If you have any further questions, please don’t hesitate to get in touch or join the discussion in our forum. You can also leave a comment in our blog to contact us.


