In February this year, we published a blog post on how to install the Bareos app via the Univention App Center. We explained how to modify the setup by adjusting some UCR variables and how to configure Windows or Linux computers from the UCS domain as Bareos clients. In this second part, we will explain in more detail how to back up a Windows client and how to configure backup jobs and schedules Bareos.
Installing the Bareos File Daemon on Windows
A quick reminder: The Bareos File Daemon is the client program that runs on every computer that you want to back up with Bareos. If you have installed the Bareos app from the Univention App Center, the Bareos Director (the server part of the backup solution) is already up and running on your UCS machine. The directory /etc/bareos/autogenerated/clients (on the UCS computer) contains automatically created configuration files for all computers in the UCS domain.
All that’s left for you to do, is to install the File Daemon(s) on the client machines. This is how to do it on Windows computers:
- Download the File Daemon from the Bareos website. Make sure to choose the correct version number. Since UCS offers version 17.2 of the Bareos app, you have to select the Windows client from the 17.2 series. The new File Daemon (18.2.5) does not work with the UCS Bareos app (17.2.6). As soon as Bareos 18.2.5 is available in the Univention App Center, you can also upgrade to the new client version.
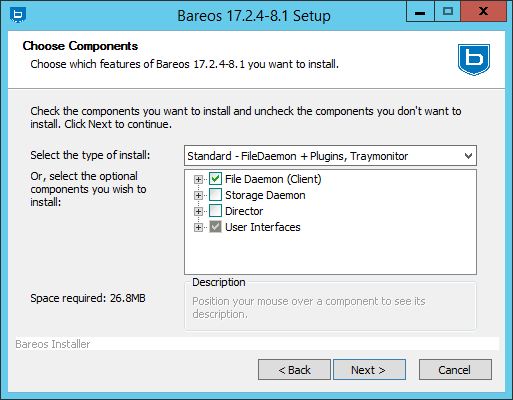
- Start the setup assistant with a double click. After you have accepted the license, select the Bareos components you want to install. By default the profile Standard – FileDaemon + Plugins, Traymonitor is activated, which you can simply accept and click on Next.
- On the UCS computer, have a look at the directory
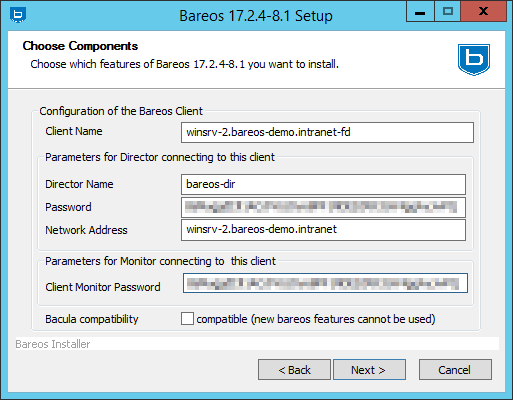
/etc/bareos/autogenerated/clients. It contains an automatically generated configuration file with the name of the Windows computer and the file extension.include. In here you can find all the information that belongs in the next dialog:- Client Name: Enter the name of the Windows computer; it’s the same as in the Univention Management Console (Devices / Computers).
- Director Name: It has to match the entry in the file
/etc/bareos/bareos-dir.d/director/bareos-dir.conf. If you haven’t changed anything, the default isbareos-dir - Password: The file
/etc/bareos/autogenerated/clients/CLIENT.includeshows the password (in the Client section). - Network Address: Please enter the IP address or the hostname of the Windows computer.
- Client Monitor Password: The password for the Windows tray monitor; it matches the password in the file
C/etc/bareos/bareos-fd.d/director/bareos-mon.confon the UCS machine.
- Confirm your settings by clicking the Next button. The last dialog shows the configuration snippet for the Bareos Director. You don’t have to follow the instructions and copy it on the UCS machine – after installing Bareos from the Univention App Center the setup file (in
/etc/bareos/autogenerated/clients) already exists. - Click Finish to complete the setup.
Creating a FileSet for the Windows Client
A FileSet defines the data that Bareos includes and excludes in its backups on the respective clients. If you have installed Bareos via the Univention App Center, you don’t have to worry about creating a FileSet manually – UCS has already taken care of that. All FileSet definitions are stored on the Bareos Director (the UCS machine) in the directory /etc/bareos/bareos-dir.d/fileset.
The file created for Windows computers is called Windows All Drives.conf. The statement File = / defines that Bareos should back up the complete computer – except for removable media such as CD/DVD, USB sticks, etc. (Drive Type = fixed). The Exclude statement makes sure the file pagefile.sys, the Windows Recycle Bin, and the hidden system folder (System Volume Information) are not part of the backup plan:
FileSet {
  Name = "Windows All Drives"
  Enable VSS = yes
  Include {
    Options {
      Signature = MD5
      Drive Type = fixed
      IgnoreCase = yes
      WildFile = "[A-Z]:/pagefile.sys"
      WildDir = "[A-Z]:/RECYCLER"
      WildDir = "[A-Z]:/$RECYCLE.BIN"
      WildDir = "[A-Z]:/System Volume Information"
      Exclude = yes
    }
    File = /
  }
}
If you want to exclude other files (WildDir = …), or if you prefer to back up specific directories instead of the full disk (File = /), then create your own FileSet definition and place it in the /etc/bareos/bareos-dir.d/fileset directory. Please don’t just change the original file (Windows All Drives.conf), as it is being overwritten with the next UCS update. Of course, you can copy the file and use it as a template for your own configuration. Remember to change the FileSet statement in the client’s configuration file (section Job in /etc/bareos/autogenerated/clients) if you want to include your own configuration.
Next, we’ll have a look at the backup jobs. UCS makes this easy for you and comes with a default backup job for Bareos.
Setting up Backup Jobs for your Windows PC
Bareos relies on backup and restore jobs, normally stored in the directory /etc/bareos/bareos-dir.d/job . The UCS app puts the job description together with the rest of the client’s configuration in the file under /etc/bareos/autogenerated/clients . The so called job resource has a unique name, a FileSet statement, and a schedule:
Client {
  [...]
}

Job {
  Name = "Backup-winsrv-2.bareos-demo.intranet"
  Client = "winsrv-2.bareos-demo.intranet-fd"
  JobDefs = "DefaultJob"
  FileSet = "Windows All Drives"
  Schedule = "WeeklyCycle"
  Enabled = "Yes"
}
Note the line Schedule = WeeklyCycle. This is the definition for schedule which we will explain in the next section.
Schedule for your Backups
The directory /etc/bareos/bareos-dir.d/schedule contains configuration files for the various schedules. UCS implements a weekly plan for the Bareos clients (file /etc/bareos/bareos-dir.d/schedule/WeeklyCycle.conf):
Schedule {
  Name = "WeeklyCycle"
  Run = Full 1st sat at 21:00                   # (#04)
  Run = Differential 2nd-5th sat at 21:00       # (#07)
  Run = Incremental mon-fri at 21:00            # (#10)
}
According to this plan, Bareos creates a full backup every first Saturday of the month at 9 p.m., a differential backup every second, third, fourth and fifth Saturday (9 p.m.), and an incremental backup every Monday to Friday at 9 p.m.
There is a difference between these three backup methods:
- Full Backup: This is a full copy of your entire data set (time-consuming, needs a lot of disk or tape capacity).
- Incremental Backups only back up data that has changed since the last full or the last incremental backup.
- Differential Backup: This is like an incremental backup but it starts with a full backup, so it contains all data that has changed since the last full backup.
If you’d like to generate your own backup plans, then you can store the configuration files in the /etc/bareos/bareos-dir.d/schedule directory. Please keep in mind that the file extension .conf is mandatory. The Bareos documentation shows some examples that you can use as templates for your own setup.
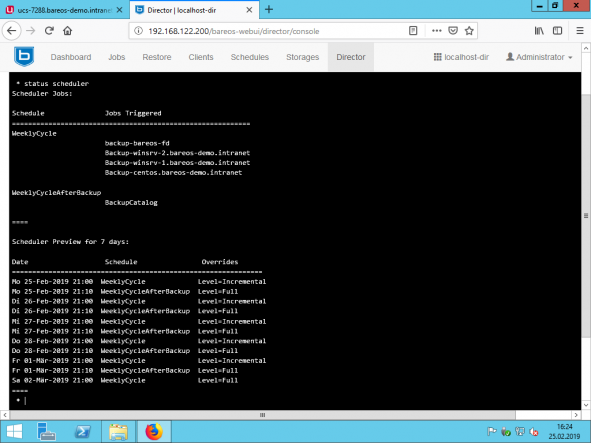
Tip: Start the Bareos Console (command bconsole in a terminal on the UCS machine) or access the console via the Web UI (section Director) and enter status scheduler to view the current schedules. You can also click on Schedules in the Web UI to get an overview of all backup plans.


