
In this article I’m going to introduce our project self-registration of users via UCS Self Services, which we have just implemented for SUSE Software Solutions Germany GmbH and their Bugzilla and openSUSE Build Service (OBS). The OBS platform is mainly used to develop the openSUSE Linux distribution, but also helps to build packages for Fedora, Debian GNU/Linux, Ubuntu and, of course, SUSE Linux Enterprise. At the time of writing this article, the openSUSE Build Service hosts about 26,000 projects, approximately 190,000 packages in 36,000 repositories. About 33,000 developers use the service and have registered an account.
At the end of last year SUSE started planning to move its Bugzilla and OBS platforms to a new server, and the operators thought it would be a good idea to implement a new solution for managing the large number of accounts at the same time. After checking out a number of identity management systems they decided to go for Univention Corporate Server. However, SUSE as a platform vendor was missing something in UCS: a feature that would allow users to create (and delete) their own accounts. They really wanted to minimize the administration effort on their end and make it easy for interested and potential users to access Bugzilla and OBS at the same time.
Our developers quickly implemented the new feature on behalf of SUSE. They thought the self-registration was a great idea, so they later included it in the official version of Univention Corporate Server. It is now available for all UCS versions (4.4-4 or newer). In this blog post I would like to introduce the new self-registration function and then show step by step how administrators configure UCS machines so that users can create and delete their own accounts via the Univention portal.
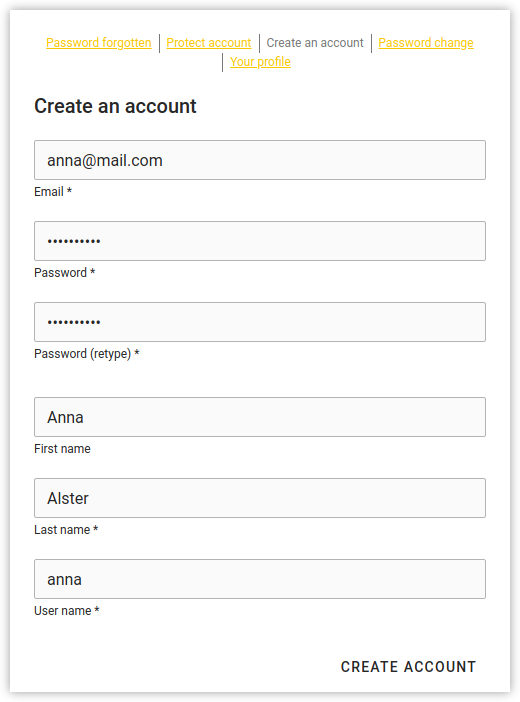
Enable and configure the Page Create an account
In order to enable the page Create an account for the Univention portal on individual hosts (where the Self Service app is installed), administrators have to activate the Univention Configuration Registry (UCR) variable: umc/self-service/account-registration/frontend/enabled=true. You can access the UCR variables via System in the Univention Management Console.
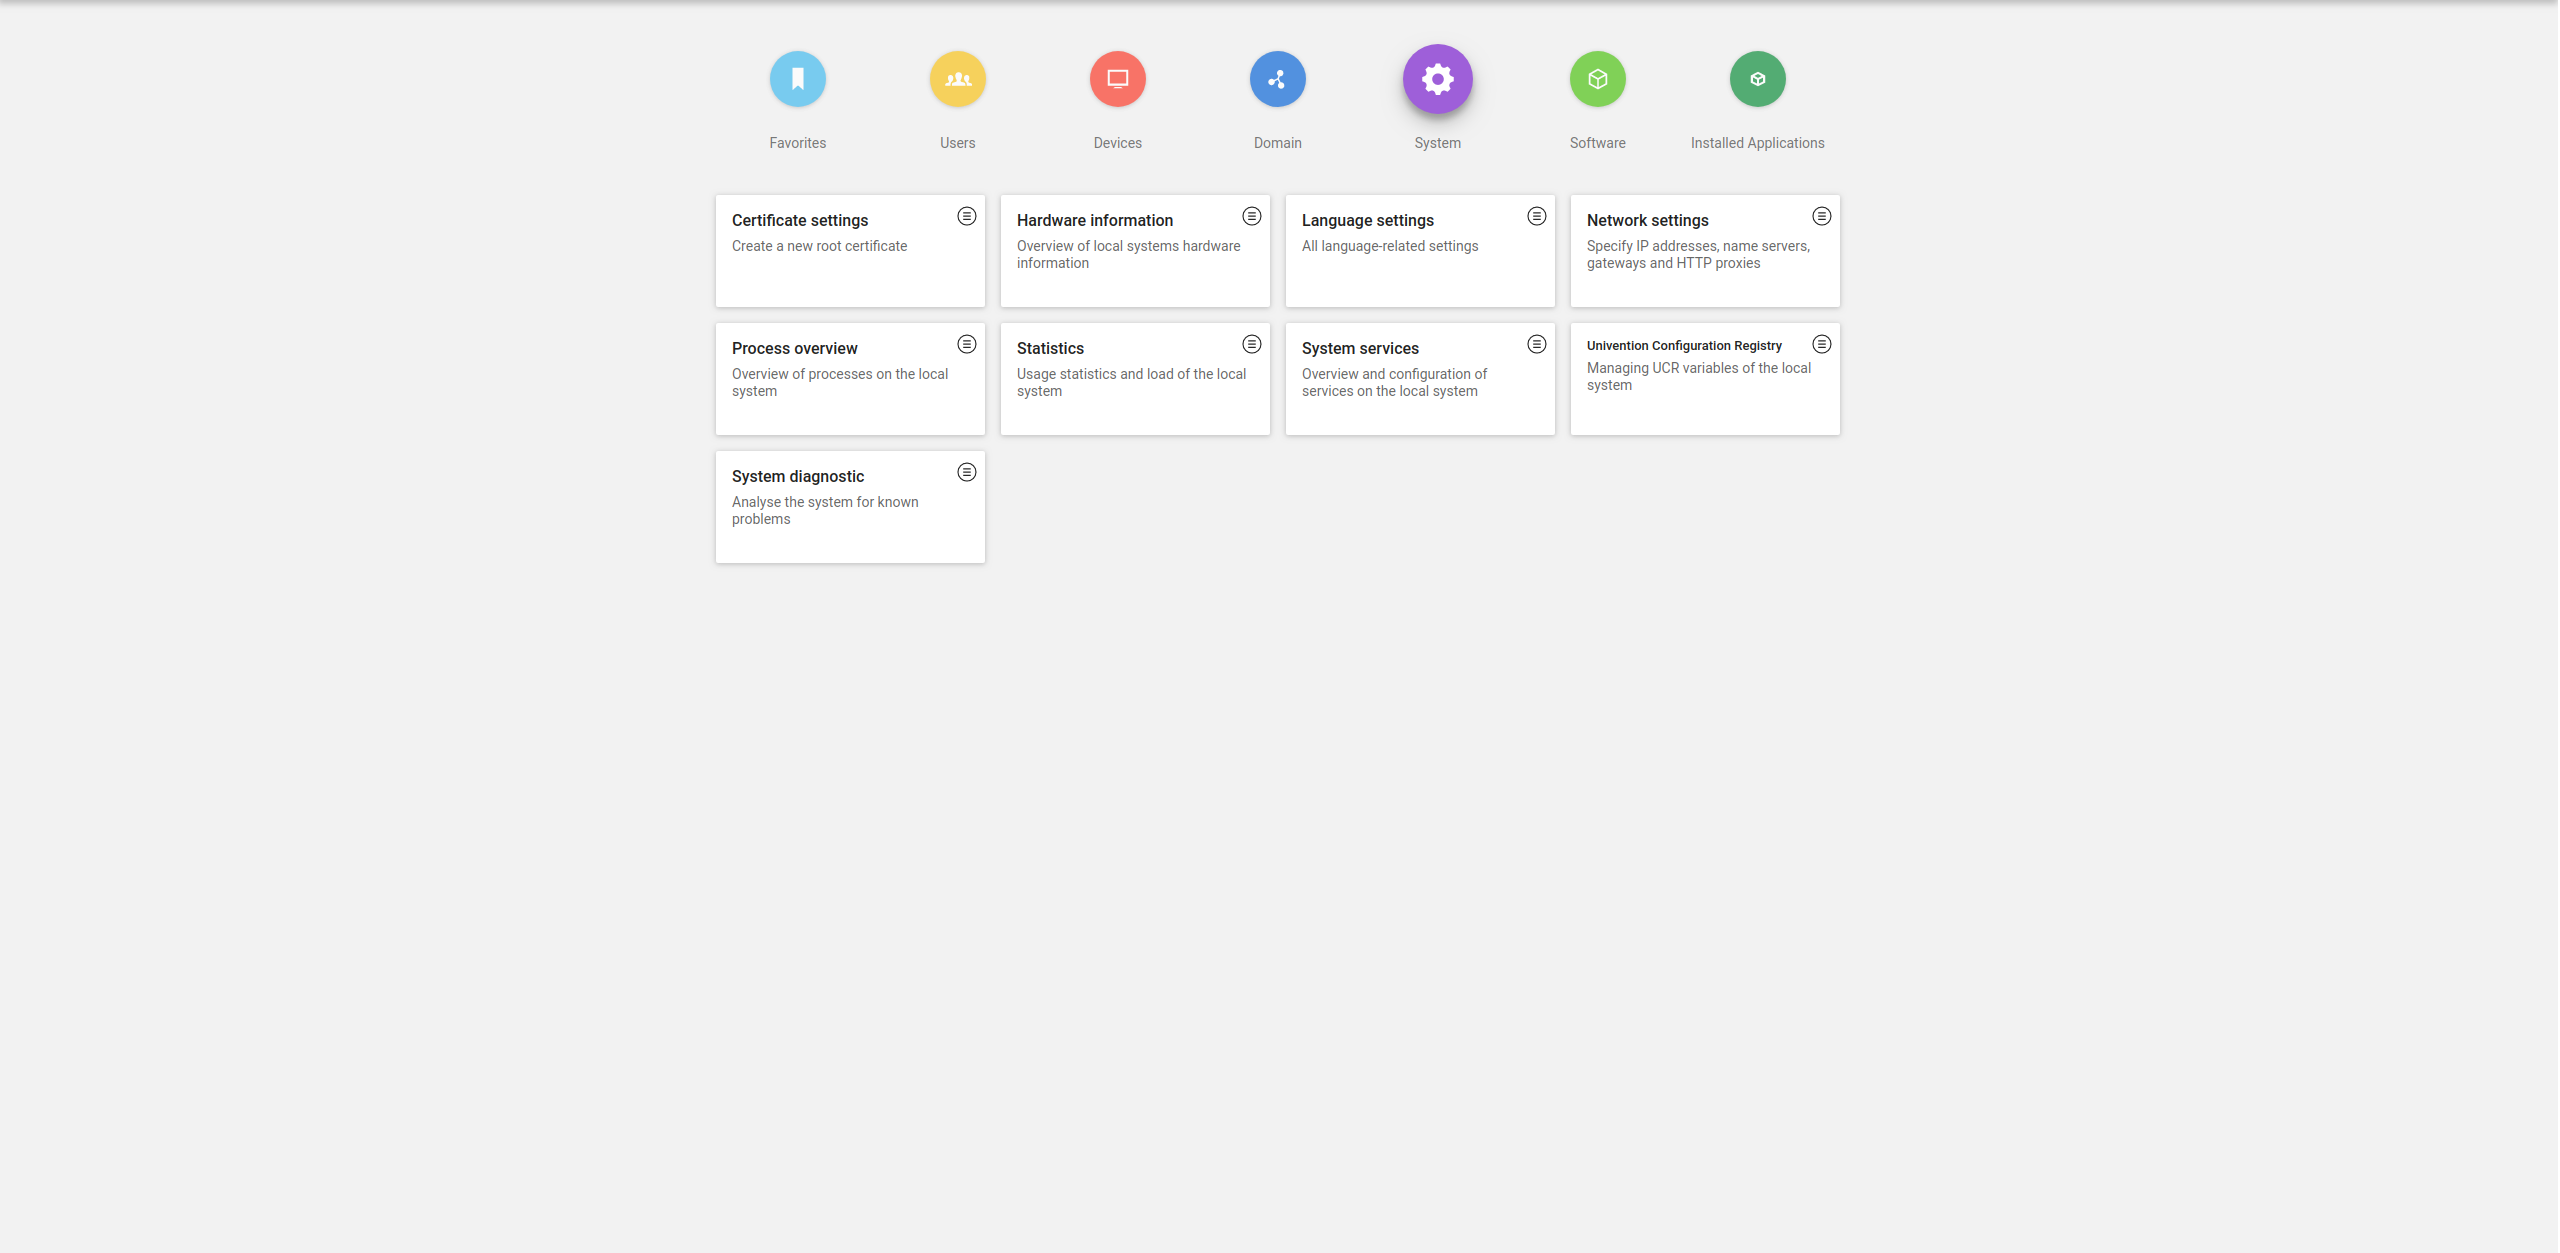
Tip: You can change the UCR variables on the command-line if you prefer.
Next, it’s time to configure various other aspects of the Create an account page that the users see during registration. You can adjust several UCR variables on the system(s) which are being defined as Self Service backend in the self-service/backend-server variable:
umc/self-service/account-registration/backend/enabled:
This activates the account registration on a UCS machine.umc/self-service/account-registration/usertemplate:
This variable specifies a user template (section 6.7) that will be used for the creation of self-registered accounts.umc/self-service/account-registration/usercontainer:
Defines a container in which the self-registered users are created.umc/self-service/account-registration/udm_attributes:
This variable configures the UDM attributes of a user account which are shown on the Create an account page. The names of the UDM attributes must be provided as a comma-separated list.umc/self-service/account-registration/udm_attributes/required:
Defines which of the UDM attributes defined inumc/self-service/account-registration/udm_attributesare required, i.e. must be provided by a user. The names of the UDM attributes must be given as a comma-separated list.
Configure the verification Email
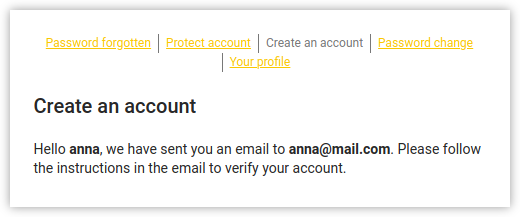
After users have clicked on Create account, they see a message that the system has sent an email for the account verification.
Various UCR variables define what this email looks like, for example, the name of the sender address, the content, etc.:
umc/self-service/account-verification/email/webserver_address:
This variable configures the hostname in the verification link URL. The default is to use the FQDN of the Self Service backend defined inself-service/backend-server.umc/self-service/account-verification/email/sender_address:
Defines the sender address of the verification email. The default is: “Account Verification Service <noreply@FQDN>”umc/self-service/account-verification/email/server:
Sets the server name or the IP address of the mail server.umc/self-service/account-verification/email/text_file:
The complete path to a text file that will be used in the mail’s body. You can find the default message in/usr/lib/python2.7/dist-packages/univention/management/console/modules/passwordreset/sending/verification_email_body.txtand use the file as template for your own messages. It uses the following strings which will be substituted accordingly:{link},{token},{tokenlink}and{username}.umc/self-service/account-verification/email/token_length:
Defines the number of characters that is used for the verification token (default: 64).
Last, but not least, you get to configure the Account verification page for the users.

How To: Configuring UCS Self Services for New Features
With the current UCS version 4.4, all of this can be done with the new function of the App Self Service without needing help from the administrator. Indeed, all you need is the user’s e-mail address (or mobile phone number to receive an SMS). Moreover, the UCS Self Service enables users to edit their own contact information and, for example, upload a profile picture or enter an address and further data. read more
Verify an Account
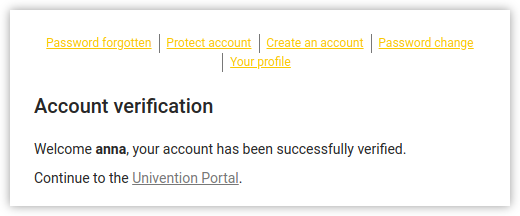
If users follow the link from the verification email, they see a dialog window in which they enter their username and the token. Clicking on Verify an account completes the entire process.
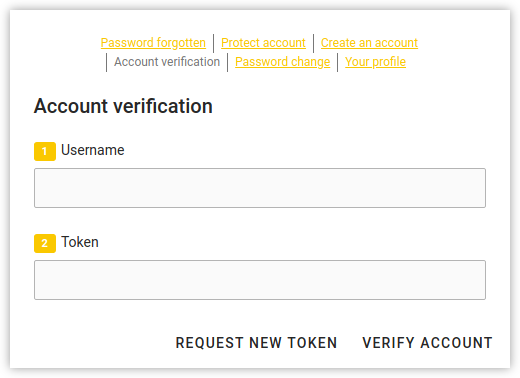
For this to succeed, administrators have to activate the UCR variable umc/self-service/account-verification/frontend/enabled on the individual hosts.
On the backend, the variable umc/self-service/account-verification/backend/enabled activates both, the account verification and the function for requesting new tokens. This is the same backend which is defined by the variable self-service/backend-server.
After users have successfully verified their account, they receive an email with further instructions. Administrators can configure this mail in the umc/self-service/account-verification/next-steps) variable. It’s possible to adjust the language by setting a locale, for exampleumc/self-service/account-verification/next-steps/defor German language.
What about Single Sign-on?
Single Sign-on (SSO) allows users to authenticate once and then automatically gain access to all programs and services in the UCS environment. If unverified accounts shall not be able to use SSO, you can configure this by setting the UCR variable saml/idp/selfservice/check_email_verification on the DC Master (domain controller) and on all DC Backup instances. This won’t effect accounts created by an administrator.
Since it’s nice to inform your users that they may not use the SSO login with self-registered accounts, you can configure your own error message. Just set the two UCR variables saml/idp/selfservice/accountverification/error-title and saml/idp/selfservice/accountverification/error-descr. Again, if you want to adjust the language, add a locale, e.g.: saml/idp/selfservice/accountverification/error-title/de
Delete a self-registered Account
The new Self Service also offers users to request the removal of their account. UCS admins activate the feature with the UCR variable umc/self-service/account-deregistration/enabled. A new Delete my account button will then appear on the Your profile page.
Strictly speaking, the account won’t be deleted immediately, but just deactivated and marked as such in the LDAP directory service. In addition, the user attribute will be set to the current time. In order to delete the objects marked as deactivated, you can use the script /usr/share/univention-self-service/delete_deregistere- d_accounts.py. The script accepts various arguments, like time specifications, and thus removes accounts that are older than a specified time. Tip: Set up a new cron job with the script to regularly clean up.
If a user has specified a mail address for the password recovery, UCS will send a message that informs about the deactivation of the account. It’s possible to configure some properties for these mails using several UCR variables:
umc/self-service/account-deregistration/email/sender_address:
This sets the sender’s address, default: “Password Reset Service <noreply@FQDN>”umc/self-service/account-deregistration/email/server:
Defines the server name or IP address of the mail server.umc/self-service/account-deregistration/email/text_file:
The email’s content; the standard message can be found in the file/usr/lib/python2.7/dist-packages/univention/management/console/modules/passwordreset/sending/deregistration_notification_e- mail_body.txtYou can use this template to create your own messages. The text can contain the string{username}which will be substituted accordingly.
Do it yourself!
The new feature is available as of now and you should receive it with the next UCS update. We have also written a new section for the user manual. If you have any questions or suggestions for improvement regarding the new self-registration, please get in touch with us: post something in our forum or add a comment to this blog article.

